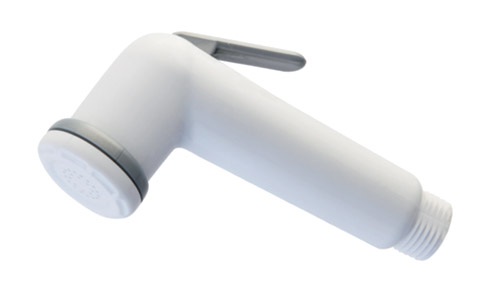
Hand Held Muslim Shower - Shattaf Bidet Spray

Portable Bidet Attachment, Mini Muslim Shower with , , Moldel No. H851 – High Quality Hand Held Shower Bidet Shattaf Spray.

Hand Held Muslim Shower Shattaf Bidet Spray

Mini Bidet Spray, Portable Bidet Attachment – Convert Any Toilet Into a Bidet. This is the original SHATTAF – high quality Muslim Shower – no imitations that leak. For an overall thorough cleaning:
  • Perfect for feminine hygiene.
  • For all muslims who require an Islamic bidet.
  • Elderly health care and physically challenged people.

Shattaf Bidet Spray comes with attachments needed to quickly and easily attach to a standard piping with each toilet. Each unit with multi options:

  • a sprayer with a trigger which controls the pressure, flow control value,
  • Long reinforced PVC hose for high water pressure shattaf bidet,
  • Angle valve or water diverter,
  • wall bracket, screws/plastic anchors.

Order high pressure resitance handheld shattaf bidet attachment from Shattaf manufacturer, shattaf supplier and shattaf factory – China Sanliv Sanitary Ware Factory.

Please visit www.sanliv.com to select more modern kitchen and bathroom faucets

Leaky Faucet Repair

Leaky Faucet Repair - Leaking faucets are annoying but easy to fix. Repairing a leak is simple with these instructions filed under Faucet repair or tagged with , .

In addition to being a waste of water, a leaky faucet is also an annoyance. Repairing a leaky faucet, however, is a fairly simple task, even for those do-it-yourselfers who are inexperienced with plumbing.

The key to repairing faucets is the inexpensive repair kits, which contain all you need to repair and rebuild a faucet.

The kits cost a few dollars, which is better than the price of a new faucet.

No matter where the faucet is leaking, it's worthwhile to rebuild the entire fixture once it's apart to prevent any future leaks.

To buy the correct repair kit, you'll need to know the manufacturer of the faucet as well as its type: Washerless or cartridge.

If you don't know what type of faucet you have, take it apart and take the various parts into you local hardware store to match them up.

Before you disassemble a faucet, however, close both the hot and cold water shutoff valves that are hopefully located under the sink.

Then, plug the drain with a stopper so that you don't lose any parts. Cover the sink with a towel to prevent damage in case you drop a tool.

As you take the faucet apart, note how it disassembles so that you can rebuild it correctly.

What follow is a guide to repairing the two most common types of faucets:

WASHERLESS FAUCETS

Washerless faucets are one of the most common type of faucets on a kitchen sink. They're usually controlled with one handle that mixes the hot and cold water.

Start the repair by determining where the leak is coming from: Around the handle or the spout.

If it's around the handle, you'll need to tighten the body cap on top of the spout sleeve. Use an allen wrench to remove the handle by loosening the set screw in the handle and pull the handle up.

Then, use a pair of slip nose pliers to tighten the cap clockwise until the leak stops. Wrap a piece of cloth around the jaws of the pliers as not to strip the chrome from the cap. There is also a cap wrench you can buy specifically to remove the cap.

If the leak is coming from the spout, you'll need to rebuild the faucet. Remove the handle and the cap. Below the cap should be a rubber and nylon cam, followed by a seal, followed by a stainless steel ball with a stem. Pull these out of the spout collar.

Below will be two small rubber seals covering a couple of springs. There will also be a pin - more about that later.

Remove the seals and pull the springs out with a pair of long-nosed pliers. Place the old springs and seals to the side so you don't get them mixed up with the new parts.

Then, pull up gently on the spout until it comes free of the faucet body. Cut the old O-rings with a knife and put new O-rings in their place.

Then, place the new springs and seals into the seats, with the flared ends of the seals on top.

Next, put the new ball in the spout, lining the slot in the side of the ball with the pin in the inside of the faucet body. Replace the spout and put the new cam and seal inside the faucet, lining up the tab on the cam with the slot on the top of the spout sleeve.

Finally, tighten the cap and replace the handle.

CARTRIDGE-TYPE FAUCETS

A Cartridge-type faucet is another washerless faucet that is similar to a seat-and-spring unit, except it has a core or cartridge instead of a ball.

At the top of the faucet will be a coverplate. Remove it with a screwdriver to expose the handle screw. Loosen the handle screw, lift up the cap and spout sleeve, and look for a brass clip that locks the cartridge in place.

Pull the clip out with needle-nose pliers, and then remove the cartridge and replace it with a new cartridge. Make sure to align it with the tabs in the faucet body.

Replace the clip and the O-rings below and put the rest of the faucet back together.

You may select more modern faucet at:
Kitchen Faucet,Bathroom Faucets,Chrome Single Handle Lavatory Faucet or,
Kitchen Bathroom Sink Faucets,Brass Bath Tub Shower Mixer Taps
Kitchen and Bathroom Mixer Taps

Kitchen & Bathroom Faucets

A reliable supplier of kitchen faucets and bathroom fixtures in China. Find various styles and functions of products online. Please browse the products by series or categories as below:


Please visit www.sanliv.com to select more modern kitchen and bathroom faucets

How To Repair a Leaking Bathtub Faucet

How To Repair a Leaking Tub Faucet - Replace worn out parts in a bathtub faucet.

The drip, drip, drip of a leaking tub faucet is a constant reminder to fix it. Go ahead—you’ll love the savings on your water bill!

The entire job, with special tools, may set you back $80 to $90, but that’s a lot cheaper than hiring a plumber, and usually cheaper and easier than tearing out the old faucet and installing a new one.

Worn rubber washers, seals or gaskets in the valve assembly cause most leaks. In this article, we’ll show you how to fix a stem-type valve, which is common in older, two-handle faucets (separate hot and cold). We won’t cover single-handle faucets here.

Repair a Leaking Tub Faucet: What You Need

You can fix most problems with the replacement parts available at bathroom hardware stores and home centers. A plumbing parts distributor will carry a much larger selection and may be able to special-order hard-to-find items (look under “Plumbing Parts and Supplies” in your local Yellow Pages).

There are thousands of different faucet replacement parts available, so bring your old parts to the store for a proper match. If your valve is highly corroded or the finish is wearing off, replace the entire faucet.

Removing the faucet handle is the toughest part of the job. Over time, corrosion can virtually weld the handle to the stem. Remove the handle. If the handle won’t come off, don’t force it—it might break. Instead, remove it with a special handle puller ($10 to $20).

Once the handle’s off, unscrew the escutcheon and stem assembly. The stem assembly controls the amount and temperature of the water dispensed through the tub spout or shower head. Remove it with a special bath socket wrench, which looks like a spark plug wrench on steroids.

Leaks usually occur for two reasons. Over time, the seat washer stiffens and won’t seal tightly. And water pressure gradually erodes the brass rim of the seat. Replace the seat using a special seat wrench ($10 to $20).

Fig. A shows the stem replacement parts and how to prepare the stem for reinstallation. Lubricate the parts with special plumber’s grease. If you’re working on a two-handled faucet, we recommend replacing the washers and seats in both the hot and cold valves.

Stem Assembly And Replacement Parts
FIG. A STEM ASSEMBLY AND REPLACEMENT PARTS

To Replace The Stem Parts:

  1. Unscrew the packing nut. Twist the stem clockwise and back it out of the bonnet. Pry out the old packing washer with a small flat-blade screwdriver or pick. Grease the stem threads and reinstall the stem in the bonnet. Grease the new packing washer and slide it in place, and then grease the packing nut threads and firmly tighten the packing nut. Use special plumber’s grease.

  2. Remove the old seat washer screw and the old seat washer. Grease the new seat washer and the threads of the new screw and then reinstall them.

  3. Pull off the old bonnet washer, grease the new one and slide it in place.

  4. Apply pipe joint compound to the bonnet threads and reinstall it in the faucet body.

  5. Grease the handle splines and replace the escutcheon and faucet handle.

Please visit www.sanliv.com to select more modern kitchen and bathroom faucets

How To Replace A Kitchen Faucet

Is your old kitchen faucet stuck and makes your kitchen work difficult? Then the one and only solution to this problem is replacing the kitchen faucet. Though the plumbing job may give you jitters, replacement of a kitchen faucet is quite simple and can be done by yourself. Just that, you need to follow certain instructions to make sure you replace the faucet correctly and avoid any further damages or complications. So if you are all set to give your kitchen a face lift by replacing your old faucet with a new one, here are ways for replacing it.

Tips for Kitchen Faucet Replacement
  • The first step is to turn off the water supply. If you skip this or ignore this, your next step would be to clean up the entire kitchen, which would be in a mess once the old faucet is removed!
  • Now, you need to remove the old faucet. A faucet is mounted in two ways - bottom and the top. A faucet that is mounted from the bottom is removed from above. The handles and the escutcheons are removed in order to get the nuts, which keep the faucet in place. The faucets that are mounted from the top are kept in place by nuts under the sink. To remove the nuts, you may need pliers or special basin wrench. A wrench may be used if the pliers are unable to reach the nuts.
  • Loosen up the nuts and keep them with aside safely. Now remove the faucet. Usually, the place where the faucet was secured has a build up. Clean it up and rub a bit of penetrating oil. If the nuts are corroded or rusted, consider replacing them with new ones. Clean the sink and get rid off the particles and build up that may have fallen.
  • Take the new faucet and assemble it carefully. The package of the faucet usually has instructions on how to assemble it. Follow it properly and do as it says.
  • Take some plumber’s putty and apply it around the faucet base, taking care to apply it as a thin coat and leave no gaps in it. Many faucets may already have rubber or plastic gaskets. Then, this step is not required.
  • Lay down the gasket over the pre-drilled holes for the faucet on top of the sink and press firmly. Now, you need to replace the faucet tubes going through the holes in the gasket in sync with the sink at the same time. Hold it firmly in place.
  • The metal nuts with threads must be tightened over the ends of the faucet on the underside. Don’t use pliers before you tighten them with your hand first. Then use the pliers and snug them down. Make sure you don’t end up breaking them by applying too much force.
  • Reattach or reopen the water valve and start the water supply. Turn on the tap for sometime and turn it off. Check for any leaks or loose ends and fix them if you notice any.
Please visit www.sanliv.com to select more modern kitchen and bathroom faucets